Record Browser
Record Browser is a general tool used by almost all modules in EPESI. It manages all kinds of record sets, from contacts to tasks to projects.
Browsing Records
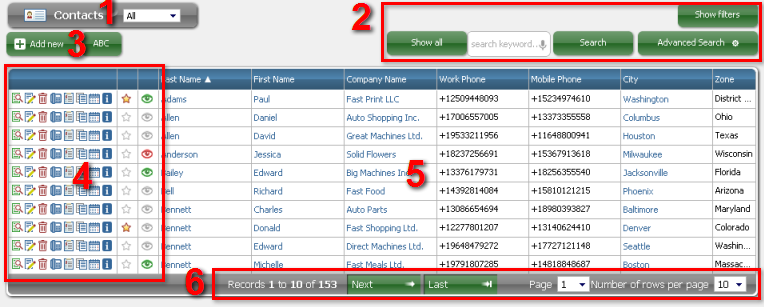
The basic functionality of Record Browser is displaying records in a structured and clear way. Together with sorting and filtering it makes a very useful tool. Below, you can see an example of using Record Browser to browse some contacts.
-
Label and basic filter The title to the left gives information which module or what type of records is displayed. The selection to the right gives the choice from three basic filters: whether you want to display all records, recently used ones or favorite ones.
-
Filters and search tool

Here you can find two very useful tools that will help you navigate through your records. Filters reduce the amount of displayed records by selecting only these fulfilling chosen criteria and search tool does that by selecting only the records that contain chosen words, phrases, etc.
a) "Show filters" button. Click this button to get the filtering options. (More about filters further down this page.)
b) "Show all" button. Resets all filters and search criteria, which results in showing all records you have permission to view.
c) Simple search. Write the word or phrase that you are looking for and click "Search" button.
d) Advanced search. This tool allows you more complex search, when you want, for example, a certain word in a specific field or a few different word fragments in a few different fields. (More about searches further down this page.)
-
Basic tools
The "Add new" button to the left serves as the easy way of adding new records. Clicking it will open a filling form.
The "ABC" button is a tool of a basic alphabetic filter. Clicking it will display a list:

Choose one of the options from this list, for example "C", to display only the records starting with selected letter. The "123" option displays all records starting with numbers and "All" removes the fiter and displays all records.
-
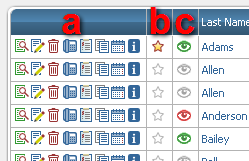
Basic functionalities
Tools and options gathered in this section will help you manage your records.
a) Actions. Here you can view the record in details
test
, edit it (click Actions edit.png), view the information about the record (hover mouse over ) and if it's created or owned by you - remove it (click Actions delete.png). You can also attach a note Actions new note.png to the record. Some types of records, like Contacts in the example, can have additional actions available, which will create different type of record with the reference to the original one (in this case: new task Actions new task.png, meeting Actions new event.png or phone call Actions new phonecall.png with the contact as a customer)
b) Favorites. The records marked with a colored star are the ones chosen by you as your favorite. Here you can also change the "favorite" status of the record - click on the Actions favorite.png to remove the record from your favorites and to make it your favorite - click Actions not favorite.png. Click here to learn more about favorites.
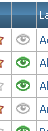
c) Watching list. This functionality keeps you up-to-date. A green eye (Actions green eye.png) means that you're watching the record (tracking changes) and that you've seen the latest version of it. A red eye (Actions red eye.png) also means that you're watching the record, but you haven't seen the latest version of it - you are not up-to-date. Hover mouse over the red eye to see the changes that have been made since you last saw the record. Clicking either red or green eye will unsubscribe the record. A grey eye (Actions grey eye.png) means that you're not watching the record and clicking it will start the watching.
-
Records
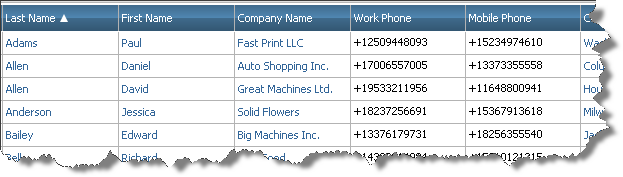
In this section you will find the most important part - the data, the content of the records. It also works as a sorting tool. On the picture below you can see a fragment of an example set of records from Contacts module. On the picture you can see blue labels (with "Last Name" and "First Name" written on them). They inform you what information is in the column below. You can use these labels to sort the records by the value of the column below the label. It's simple - just click the chosen label. Clicking it more than once will switch between ascending and descending order. Ascending order is marked with a triangle pointing to the top. It looks like this:

Descending order is marked with a triangle pointing down and it looks like this:

-
Navigation

When there are many records, they often must be displayed by pages. On the bottom you will find a tool, that will let you easily navigate through all the pages.
a) Here you can see, which records are displayed at the moment.
b) These buttons help you navigate through the pages. On the first page you will see only these two ("Next" and "Last"), but on other pages you will also see "First" and "Prev" buttons, that will let you go back to the previous pages.
c) Here you can jump to a specific page. Choose the right number from the select box.
d) Here you can set the number of records that will be displayed per page - the more records per page, the less pages.
Record Details
The exact layout and content of the record details strictly depend on the type of record. Therefore every type of record may look completely different in the detailed view. There are however some interface parts common for all records based on Record Browser and these will be presented in this section, with the record of a company used as an example.

-
Module Name Here you can see what module you are in or what type of record you are seeing. The arrow to the right can be used to jump to the specific record - click it, enter the record id and press Enter.
-
Actions

This panel contains many useful and often used tools to help you manage the record. Hover mouse over any of these icons to see a tooltip that will explain what kind of functionality you will get when clicking on it. More detailed description attached below:
-
watching buttton. There can be two different icons in this spot: Actions green eye.png or Actions grey eye.png. All of them refer to the status of your tracking of this record.
-
favorites indicator. You can also see another icon here: Actions not favorite.png. They inform whether record is among your favorite ones or not.
-
basic info. Hover your mouse over this icon to see some basic information about the record's creation, edition etc.
-
copy tool. It allows you to copy values from the record in an easy and convenient way. When you click it, a window with record's essential values will appear. To copy them click "Copy" button or use a keyboard shortcut.
-
history. Click this button to see detailed history of all changes that were made to the record. If there weren't any changes, the button is inactive and it looks like this: Actions not history.png.
-
these buttons and some other may appear on this action panel depending on the type of the record. These ones create new event, task or phone call connected with the record.
-
new note. Click here to add a new note to the record.
-
-
Main Area
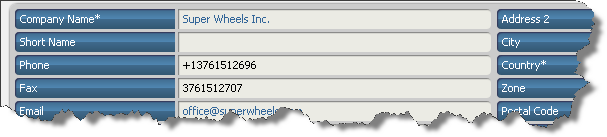
Main area is an essential part of this view that contain the data stored by the record. Here you can see the whole information gathered about the particular thing (like company, in this example). The fields with blue background inform about the type of information that is displayed in the fields with white background. The little star symbol * indicates that the field is obligatory to fill.
-
Addons

This space, located below the main area, is where all kinds of addons can be found. What you will see here depends on the type of the record. For example, for any company you can display here a list of contacts connected with the company (assigned in the system as employees of this company), notes, activities and mails connected with the company and some others. For more detailed description of the addons go to the parts of this manual that cover the specific modules/types of records.
Recent and Favorite Records
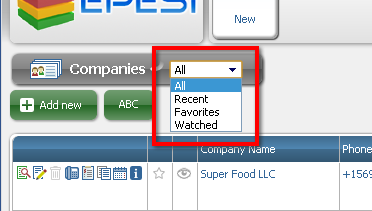
Usually there are many records stored in a system, but not all of them are of interest for the particular user. To help you display only the records you want Record Browser offers a very useful tool: displaying recent or favorite records only. To choose one of this options, select it from the basic filtering list placed near the title of the module you are currently browsing (on the picture "Companies" module is used as example). There are 4 options available on this list: "All", "Recent", "Favorites" and "Watched". "All" means that you want to display all possible and available to you records in the category. "Recent" will display records recently seen by you - usually the last 15 you've seen (but this depends on the module). "Favorites" option is used to display only these records that are marked as your favorite. Majority of modules use favorites as a tool, but you may sometimes encounter a module without this functionality, for example, Phone Calls.
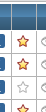
When module uses favorites there is a special column visible (when browsing records) that shows whether record is one of favorites or not. Yellow star icon (Actions favorite.png) means that the record is on the favorite list and will be displayed when the "Favorites" display option is chosen. Clicking on this icon will remove the record from favorites (and the icon near the record will be changed to gray star). Gray star icon (Actions not favorite.png) means that the record isn't on the favorites list and won't be displayed in the "Favorites" mode. Clicking this icon will, analogically, make the record one of the favorites (and change it's star icon to yellow one). The same star icon you can see while viewing record details, in the top right corner, among other actions. You can use it the same way as the ones in browsing records mode.
Watchdog
Watchdog is a very important and useful tool implemented in the system. The main idea behind it is to allow users to track changes in records that are important or interesting for them. Starting to watch a record means that from that moment you will be notified of all the changes that are made to that record. For some specific types of records not only changes are tracked, but also the records that use the watched record are listed. For example if you watch a contact, you will be notified of all the tasks that are assigned for this contact, provided you have an access to them.
The basic and most convenient way of displaying tracked changes is a dashboard applet specifically designed for Watchdog. However, you can view them through Record Browser as well. You can see whether the record is subscribed by you or not and you are informed whether you've seen the last changes or not.
While browsing records, the column that covers these aspects is displayed (on the picture). There you can see eye icons in three different colors. The grey eye (Actions grey eye.png) means that you don't watch the record, the green one (Actions green eye.png) means that you are watching the record and you have seen all the changes, the red one (Actions red eye.png) means that you are watching the record and haven't seen recent changes. Hovering the mouse over the red eye will display a tooltip with the changes made since you last viewed the record. Clicking a red or green eye will stop watching of the record and clicking a gray eye will start it. To change the status of the record from red to green eye you may view the record (click on it to view its details) or mark the changes as seen in the Watchdog applet. You can see a similar eye icon while viewing record details. It is located on actions panel in the top right corner. It can be either green or grey and you can use it to start or stop watching the viewed record.
Filters
Filters offer you a convenient tool of customizing the way you're browsing records. They allow you to see only the records that meet specified criteria - have certain values in chosen fields.
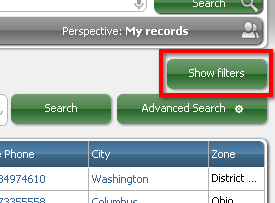
Using filters is very simple. While browsing records click the "Show filters" button, that is located in the top right corner of the displaying area (as shown on snapshot above). This will display filtering fields which you can use to select the chosen values. The "Hide filters" button will replace "Show filters" button. Click it if you no longer want to see possible filters.
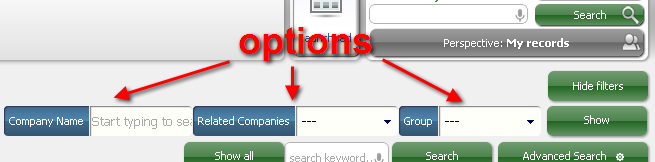
The selection of fields by which you can filter depends strictly on the type of displayed records. On the snapshot you can see an example where contacts were used and possible options here are "Company name" and "Group". To filter your records choose values of the options and then click "Show" button.
Search
There is a search function implemented in Record Browser to help you browse through records even more efficiently and easily. Use it when you are looking for a record or records with specific phrase, word or set of letters (or numbers) in one of its fields.
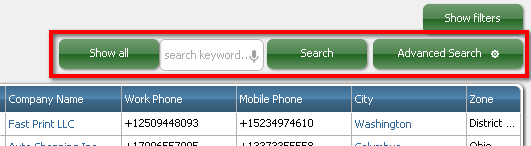
Searching tools are located in the top-right part of the displaying area (as shown on the snapshot above). Use simple search when you want to search by one keyword/phrase. Write it in the field with "search keyword..." written in it and click "Search" button. The records containing this word or phrase in any field will be displayed. If your search needs at the moment are more complex you might want to use advanced search. When you click the "Advanced Search" button, special fields will show up in the main area.
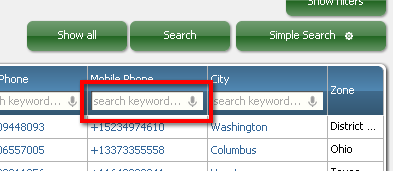
Advanced search will allow you to look for a specific keyword/s in specific field/s. Write the phrases in the fields and click "Search" button to display only the records with chosen values in selected fields. Some of the fields may be unavailable for search (like the last field on the picture). If you want to go back to simple searching, click "Simple Search" button.
Notes
To make your information storage more flexible every record has a possibility to attach notes to it. Any kind of information can be linked with the record this way, from loose comments to documents to additional data that doesn't fit in any of the record's fields. Notes are displayed under the main area in record details among other addons.
-
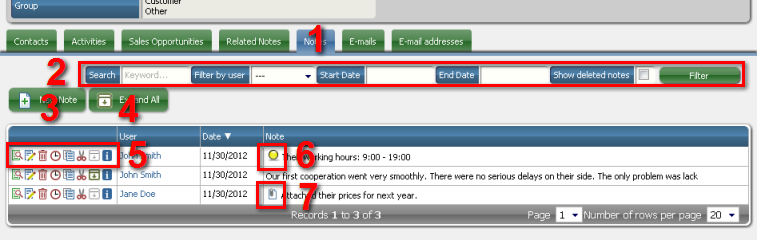
Notes Addon - click this label to see the notes attached to the record. If it's displayed in blue that means you are already viewing the notes.
-
Filters - this panel allows you to display only selected notes. You can filter by date (setting time range), user that created note or deleted status (this one not always available). You can also search by keyword. Enter the chosen values to the right fields and click "Filter" button.
-
New note - click this button to add a new note to the record.
-
Expand all - toggle this button to either expand or collapse all notes. A note is expanded when you can see it whole from this view.
-
Actions - here you can see the actions that you can perform on the note. From left to right: view note (Actions view.png), edit note (Actions edit.png), delete note (Actions delete.png), history (Actions history.png), copy note (Actions new note.png), cut note (Actions cut.png), expand if possible (Actions expand.gif / Actions not expand.gif) or collapse (Actions collapse.gif), basic info (Actions info.png). Click on the icon to perform respective action. The last icon shows basic info in a tooltip after you hover mouse over it.
-
Sticky - this icon indicates that the note is "sticky". That means that it will be listed before all "not sticky" notes.
-
Attachment - this icon indicates that the note has an attachment. Click it to see the attachment.
User Settings
There are many settings and tools in Record Browser that are optional and can be changed. They are split in two main categories - "Browsing tables" and "Browsing records". Both of them are accessible in the same way - via control panel.
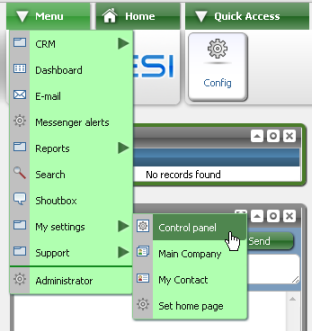
You can access control panel by choosing it from menu: Menu -> My settings -> Control panel (as shown on the picture). Here you can find buttons that will get you to both Record Browser settings categories among other. "Browsing tables" category contains more general settings, like number of records per page, while "Browsing records" deals with matters like the way of displaying specific types of records.
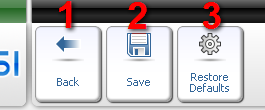
The general way of managing this settings is common for both categories. While in one of the categories (after clicking on it), on action bar you can see a few buttons - back, save and restore.
-
Back button is used to leave the settings category without making any changes. It takes you back to control panel.
-
Save button is used to save the changes in settings that you made. It saves the changes and takes you back to control panel.
-
Restore button changes the settings to default values. It doesn't however save this changes. You still have to confirm (using Save button) or cancel them (by using Back button).
Browsing Tables
Browsing tables options category groups the general browsing settings that are applied in all modules and to all kinds of records. Here you can find settings dealing with the look of the record tables, searching and sorting.
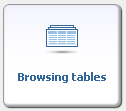
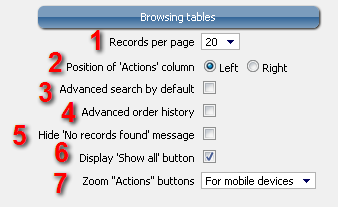
After clicking the "Browsing tables" button from control panel you will see the list of options (on the picture below).
-
Records per page The number chosen here indicates how many records will be displayed on one page. If the number of records you want to display is greater than the number chosen here, the records will be divided to pages through which you will be able to easily navigate. The possible options here are: 5, 10, 15, 20, 25, 30, 40 and 50. This setting can be also changed in browsing records mode - the select is located in bottom right part.
-
Position of "Actions" Column The default position of "Action" column while browsing records is "Left" - this column is displayed as the first one on the left side. However, if you prefer to have it as most to the right one, you can do it by setting this option to "Right".
-
Advanced search by default This setting allows you to change the default search mode. You can always change between the modes while browsing records. This option only indicates what mode you start with. If you want to start with the simple search leave this field unchecked.
-
Advanced order history Selecting this option will allow you to see more detailed information about the sorting that is used at the moment. This information will be displayed below the table with records in browsing records mode.
-
Hide "No records found" message If this option is checked, the message "No records found" will not be displayed if there are no records to display.
-
Display "Show all" button If you want to make your search even easier, you can display "Show all" button, that will allow you to reset all searching options and show all the records. If you choose not to put another button on your interface you may still reset searching options by clearing them manually. The button is displayed next to "Search" button (to the left) in browsing records mode.
-
Zoom "actions" button This option lets you choose, when do you want to be able to zoom actions section before clicking in any particular action. It is especially useful when you use EPESI on mobile devices with touchscreens, but you can also choose to use it always or not use it at all.
Browsing Records
Browsing records category mainly allows you to set several options for each type of records separately. You will also find here some options dealing with creating and editing records.
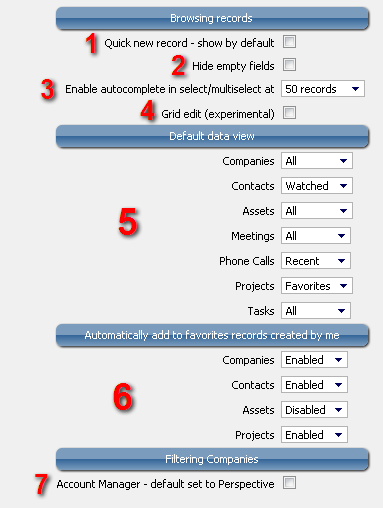
Click "Browsing records" button from control panel to display options of record browsing. You can see them on the picture below.
-
Quick new record - show by default Checking this option will allow you to create new records from browsing records mode. If you have this option enabled then (while in browsing records mode) clicking "Add new record" will display empty row ready to be filled with data instead of redirecting you to another view. This is simpler and faster way of creating new records, but this way you can fill only some of the fields from the record, namely the ones that are displayed in browsing records mode.
-
Hide empty fields Checking this option will result in empty fields not being displayed in record details view. This makes record's data easier to find and read. When you edit a record, all fields will still be displayed.
-
**Number of records that triggers autocomplete For field types that let you choose value or values from list it's easy to become hard to use because of too many options to choose from. That's why for larger numbers of possible records select and autoselect fields change the method of selecting them. Instead of using list they let you search with the help of autocomplete function. This setting here lets you choose the exact number that triggers the change.
-
Grid edit This option allows you to edit some of the records fields from browsing records mode. The fields that can be changed will show small edit icon when you hover a mouse over them. Clicking this icon will allow you to enter and save a new value.
-
Default data view The options gathered in this group allow you to choose the default way of displaying each type of records. You can choose from three basic view modes: to see all records, to see only favorites or to see the recent ones. You will see the settings for all installed modules. These settings can also be changed while browsing records (basic filter next to the module label).
-
Automatically adding your records to favorites This group of settings allows you to toggle automation that will add to favorites all the records of chosen type you create.
-
Default filter for Companies Account Manager Here you can choose whether you want to display by default only Companies for which Account Manager is set to your Perspective (usually you) or all. This affects only browsing mode and can be changed wile browsing by resetting the corresponding filter.